
For years, I have been developing web applications using PHP, primarily Laravel. As I have played different roles in various companies, I knew how to install my PHP/Laravel applications on cloud servers like AWS, DigitalOcean, and others. We know that these cloud servers are essentially just computers/machines like the one you are using to read this article. However, I have always wondered if it were possible to serve my Laravel applications from my own computer at home (whether it's a laptop, desktop, or another machine). At first, I thought I needed a public IP so that my computer could be accessed publicly, but I use a shared internet, so I assumed it was not possible. As it turns out, I was completely wrong. It's entirely possible to host my web app from a shared internet too! I had been considering buying a Raspberry Pi for some time, but I held off because I was uncertain about many things. For example, the Raspberry Pi doesn't have a display, and I wasn't sure how to connect my monitor via USB-C or how to connect my Bluetooth keyboard and mouse. Additionally, I wasn't sure if the Raspberry Pi had these drivers pre-installed or if I would have to install them manually. Although I knew it was possible to resolve these basic issues, I lacked confidence in doing so without experiencing pain. Perhaps this can be an experiment for the future.
Just a few days ago, my office made an announcement that they were selling some of their old laptops and desktops. To my surprise, the Lenovo Thinkpads they were selling were almost the same price as a Raspberry Pi with a casing/cover, but much more powerful and resourceful in terms of their keyboard, display, touchpad, wifi, bluetooth, and ports. Even the most basic DigitalOcean or AWS machine costs at least $5 per month. Running a laptop 24/7 as a server does come at a cost, but considering the CPU and memory I am getting, as well as the energy cost, it's not that expensive. I decided that it was the perfect time to purchase one of these laptops from my office and finally perform the experiment I had been wanting to do for a long time. Thanks to my office, I was able to buy an old laptop and fulfill my desire.

What you need?
- A laptop/machine to serve your application: I bought an old Lenevo Thinkpad T-460s(Intel Core i5, 12 GB RAM, 256 SSD).
- A domain you own: I own domain from GoDaddy
- An account in Cloudflare
Installing OS in that Machine(Laptop)
I personally used Ubuntu few years for web developed. Besides, I also managed/maintained Laravel application in Cloud Server before where Ubuntu was installed. Ideally, as I want to use the laptop as a server I should install Ubuntu Server in it. As the ubuntu server doesn't have any GUI, I was not confident about setting network connection(WiFi) using Command Line Interface(CLI). I mean, how will I even use internet in it? Definitely possible, but was a bit in hesitation due to lack of experience. While using cloud server I never had to bother about network. I was looking for a lightweight ubuntu desktop, so that I can use a GUI desktop interface at the same time it won't consume much resource. So, I went for LXDE Ubuntu Desktop called Lubuntu. After installing it, I don't like the interface, but I can connect to WiFi, I can use it's terminal(CLI), I can use a powerful Internet browser(Firefox pre-installed) without doing anything extra! That's what I wanted, we will need these later. Our server machine(Laptop) is ready, we are ready to start!
Installing Apache, MySQL and PHP
To serve our PHP(Laravel) application we need, a Server(eg. Apache), a database(eg. MySQL) and PHP itself. It's a typical journey of setting up any server to serve a PHP application. This stack is called LAMP(Linux, Apache, MySQL, PHP) stack. I did this many times before, here are the commands I mostly run:
Install Apache
sudo apt update
sudo apt install -y apache2
sudo a2enmod rewrite
Now, if you open the browser and visit URL http://localhost/, you should see the
Apache typical welcome page. We made the rewrite module enabled as we need to skip index.php file in Laravel application URL.
Install MySQL Server
sudo apt install -y mysql-server
If you run sudo mysql -uroot in the terminal you should enter into the MySQL CLI. Type exit and press ENTER to exit from there.
Install PHP with All Required Extensions
sudo apt install -y php libapache2-mod-php php-mysql php-common php-cli php-common php-json php-opcache php-readline php-dom php-curl
You can check if PHP is installed correctly and what version, using the following command:
php -v
DigitalOcean has tutorial containing these same steps with minor differences. Feel free to check it out too.
I also installed Composer as we will need to install PHP dependencies of our Laravel application in later step.
sudo apt install -y composer
Setting up Laravel Application
If you are experienced with Laravel, you already know the installation process.
I cloned my project in /var/www/ from Github. If you are following this article to experiment the same thing but
don't have a Laravel application, you can install a fresh Laravel using following command:
composer create-project laravel/laravel example-app
Now, we have /var/www/example-app directory that contains our Laravel application.
After going inside the directory using cd /var/www/example-app
I need to do two things to do now.
- Install PHP dependencies for Laravel application using
composer install. For fresh Laravel, this command won't download anything. - Copy
.env.examplefile to.envfile and edit the new.envfile with correct database credentials. By the way, we haven't mentioned the step of creating database for this application. I believe, I don't have to explain how to create a database in MySQL, if you need this, please write me in the comment section I will update this article. - Now, I have to serve the application using apache. I will create a virtual host to host this application in a different port
instead of the default one. Doing so, we can understand the fact that it's possible to host any other Laravel application in
the same server using another port.
From terminal, I wen to
/etc/apache2/sites-availableusingcd /etc/apache2/sites-available
Then open the file with SUDO permission using vim or nano(recommended if you are not familiar with Vim)
to create a file named example-app.com.conf with the following content(apache config):
Command used sudo nano example-app.com.conf
NameVirtualHost *:81
Listen 81

<VirtualHost *:81>
    ServerAdmin [email protected]
    DocumentRoot /var/www/example-app.com/public

    <Directory /var/www/example-app.com/public/>
            Options Indexes FollowSymLinks MultiViews
            AllowOverride All
            Order allow,deny
            allow from all
            Require all granted
    </Directory>

    LogLevel debug
    ErrorLog ${APACHE_LOG_DIR}/example_app_error.log
    CustomLog ${APACHE_LOG_DIR}/example_app_access.log combined
</VirtualHost>
Save and exit this file. Then run sudo a2ensite example-app.com.conf and then sudo service apache2 reload to enable the virtual host and
activate the configuration.
By the way, make sure the Laravel application has correct permission using the commands below:
sudo chmod 755 -R storage
sudo chown www-data:www-data -R storage
sudo chmod 755 -R bootstrap/cache
sudo chown www-data:www-data -R bootstrap/cache
Now, if we go to my web browser and visit URL http://localhost:81, we should see our Laravel application running!
At this point, we should also be able to access this Laravel application from another machine(eg. Mobile, Laptop) in the same network(WiFi) using the local IP.
We can see the local IP using the command:
hostname -I
This command will give us a local IP, for example it might look like this: 192.168.188.33
So, from our mobile should be able to access our Laravel application in the browser using URL: http://192.168.188.33:81
We can even access using our computer name, for example my Laptop's computer name is HomeServer1 so
I can access from my mobile using URL http://homeserver1.local:81
I know, we have done nothing excited yet, but many beginner developers don't know these minor things.
Now, let's begin the interesting part! Let's publish our Laravel PHP application to the internet so that anyone with internet connection can access our website from anywhere in the world...
Using Cloudflare to Make Our Web App Public
Remember? At the beginning of this article I mentioned, I use to think I need a public IP to make my local computer accessible publicly. But I was wrong, because of tunneling we can make our local computer accessible to internet publicly using tunnel. The caveat is, we need a publicly available server to make this tunnel, and I don't have that. Good news is there are services that provide free tunnel service. I used Cloudflare Tunnel to create a tunnel from my Local Laptop to Global Internet. Make sure you created your account in Cloudflare.
Steps to Make It Publicly Accessible in Internet:
I mostly followed Cloudflare Zero Trust Documentation to set up the tunnel. There are always things we want but are not provided in the documentation because when we work we use multiple services. After spending many stressful hours, we need to put them together to achieve what we want. Here is what I did:
1. Connecting your domain with Cloudflare
After logging in into my Cloudflare account, from my dashboard, I went to the menu named Websites. After clicking on this menu,
there is a button called Add a Site. I clicked on Add a Site and entered my domain name that I own, for example: example-app.com then saved.
After saving It asked me to select a plan, I selected free plane and pressed Continue.
Then Cloudflare scanned existing DNS record, from where you bought it.
So, it scanned all the DNS record that I have in my domain in GoDaddy. I pressed Continue.
Then it told me to log in to my GoDaddy and change the nameservers to Cloudflare's nameservers:
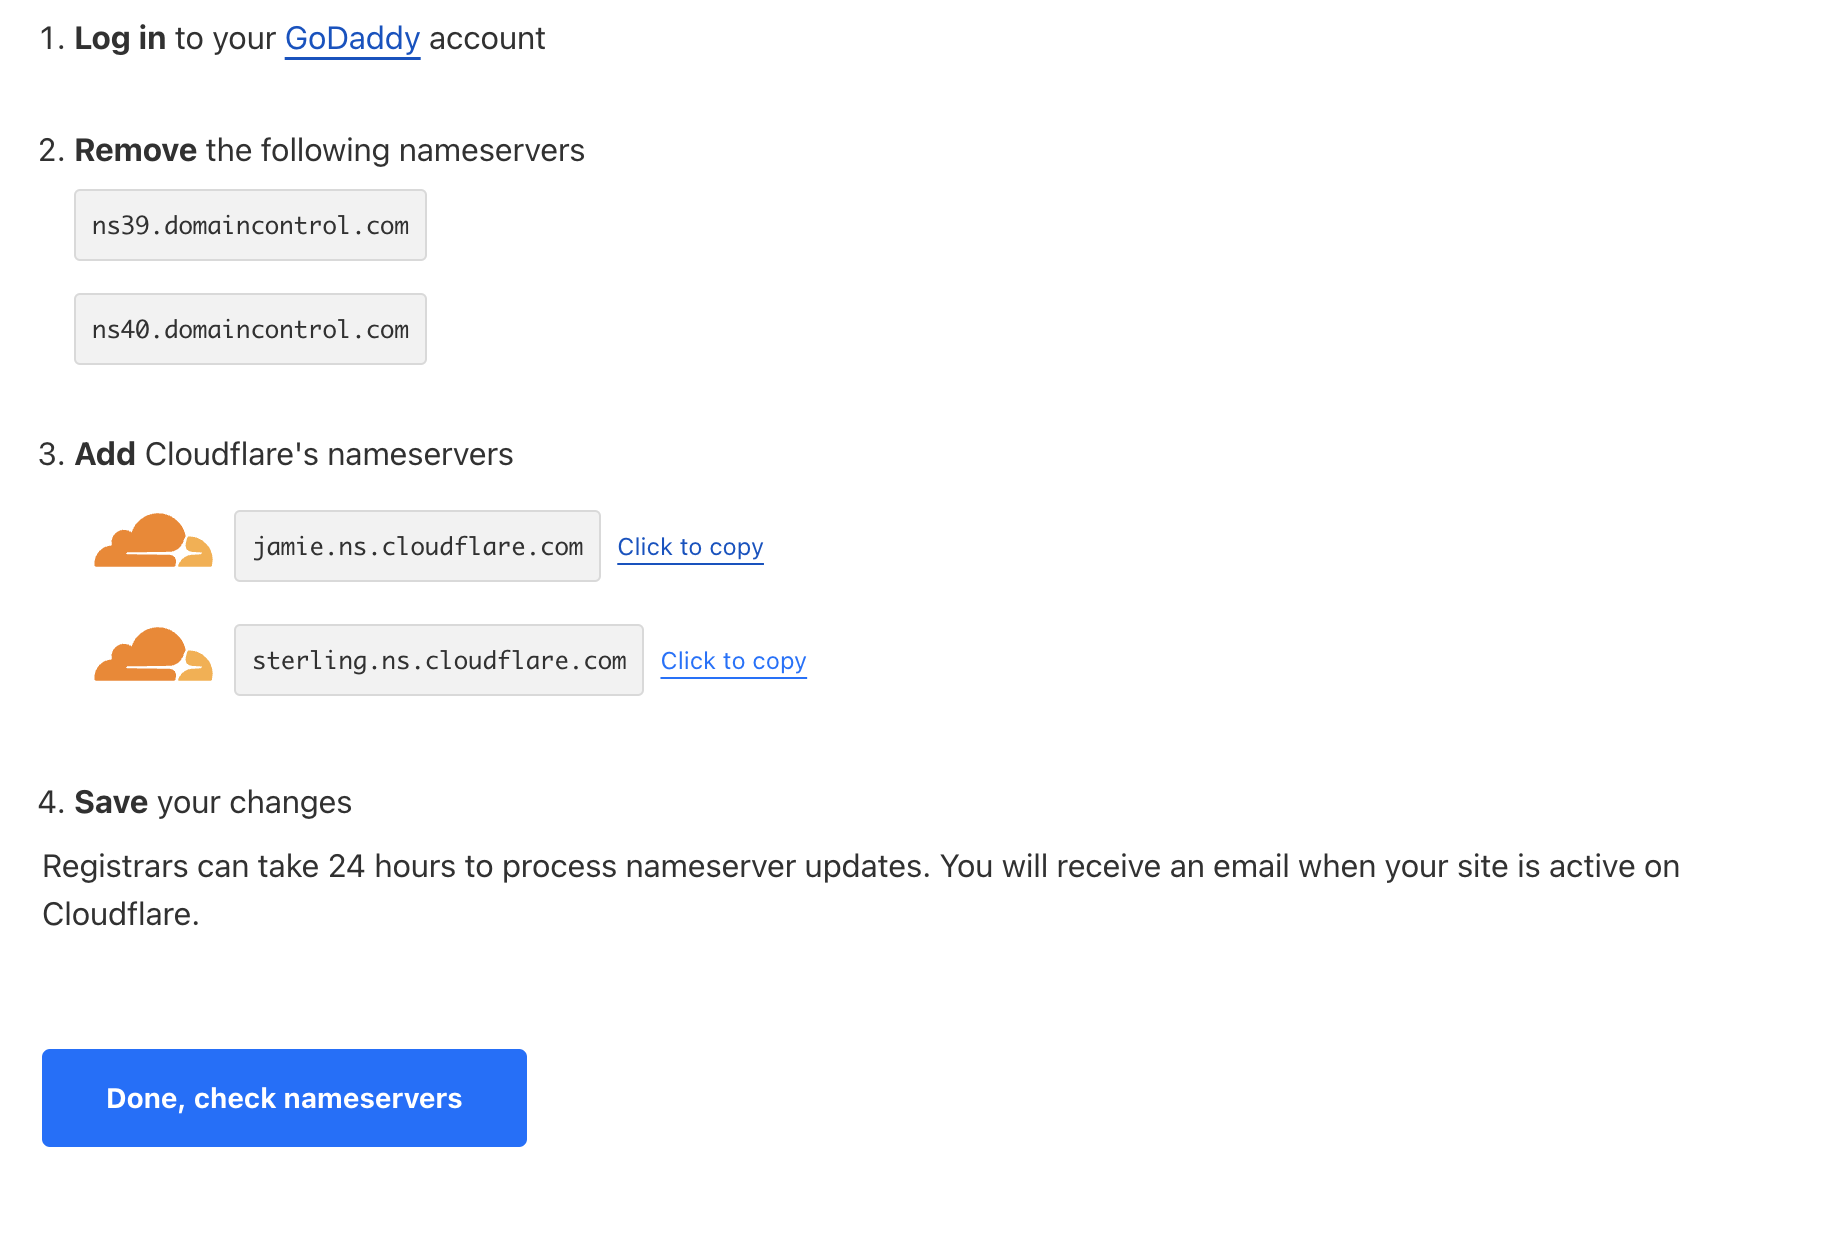
By doing so, we are basically giving Cloudflare the full control to manage your domain's DNS records. I did so, and it took a while. After changing the nameservers you can come back to Cloudflare and pressed Done, Check nameservers button. After a while, once Cloudflare nameservers are activated, I expected my web application that was hosted on a different server will not be accessible as there is no DNS record in our Cloudflare at this moment. So, in the meantime, I proceed to the following steps.
2. Install Cloudflare in laptop
As I installed Lubuntu(Linux) in my laptop, I downloaded the cloudflared using command provided for.deb from here: download and installation command
In case the command doesn't work, make sure you use SUDO while doing it. Or do sudo su and follow the process as a root user.
After installation if you run the following command in terminal:
cloudflared -v
you should see the version of the cloudflared client.
3. Authorizing Cloudflare tunnel with your connected domain
Then I authenticated Cloudflare tunnel to the domain I added in previous step, so that it can manage DNS record from my laptop. I used the following command:
cloudflared tunnel login
It provided me a link, I copied that link and pasted in the web browser. As I was already logged in into Cloudflare, It gave me the list of domain I added.
I selected my domain, for example: example-app.com
Once selected the domain in web browser, in the terminal it created a cert.pem file in /root/.cloudflared/ directory, and finished executing.
I believe, cloudflare will use this certificate cert.pem to later access cloudflare services from CLI cloudflared in my laptop.
4. Create Cloudflare tunnel
Now, we can create tunnel from our CLI. Point to be noted here is, you can also create tunnel from Cloudflare interface too. But CLI seemed more convenient to me. Used the following command to create a tunnel:
cloudflared tunnel create home-server-01
Here home-server-01 is my tunnel name. You can set this to anything you want. A tunnel is created and that tunnel also has Tunnel-UUID.
A credential file also created in /root/.cloudflared/ directory with <Tunnel-UUID>.json. We can always see the tunnel
name, UUID using the following command:
cloudflared tunnel list
Also, in Cloudflare web interface, we can go to Zero Trust > Access > Tunnels to see the tunnel we just created is listed.
5. Configure Tunnel to Serve My Laravel application
Then I created a file called config.yml inside /root/.cloudflared directory. In that file we have content as below:
tunnel: <Tunnel-UUID>
credentials-file: /root/.cloudflared/<Tunnel-UUID>.json

ingress:
  - hostname: example-app.com
    service: http://localhost:81
    originRequest:
      noTLSVerify: true

  - service: http_status:404
In place of <Tunnel-UUID>, I have the tunnel UUID of the tunnel I created in the previous step. As a hostname I used my domain name,
we can use subdomain name here too. Don't forget to put the correct port for the service.
6. Routing the traffic
Ok, now we need to tell our new nameserver in Cloudflare that, if some hit this domain name, we should send him to my local computer using the tunnel we created. We need this command to be executed:
cloudflared tunnel route dns home-server-01 example-app.com
Doing this, we are routing our Laravel application using Cloudflare tunnel and DNS records. When I visited Cloudflare dashboard's Websites > example-app.com > DNS > Records I saw that a new CNAME record is added in my domain's DNS record. This was added by the command I run.
7. Running the tunnel
Now the moment of truth, time to run the tunnel and see my Laravel application is being served from my own Laptop. Here is the command to run the Tunnel:
cloudflared tunnel run home-server-01
By the time my nameserver was changed from GoDaddy to Cloudflare.
In your case, if your domain is still in Pending Nameserver Update even after changing the name server
in your domain service, you might need to wait a little more.
Then, I visit my domain/hostname, for example https://example-app.com walla in the browser!
Finally, my Laravel application is running from my local Laptop machine!
8. Run tunnel as a service
There is one small issue, when I run the previous command to run the tunnel, it doesn't run as demon(in the background). As a result once I close the terminal or close the execution using Ctrl+C, my application goes down! So, either we need to keep this terminal always open and running, or we can run the tunnel as a service in the background. To run the tunnel in the background, I installed Cloudflared service and started using following command.
cloudflared service install
systemctl start cloudflared
That's it, now the tunnel will be running in the background even if we close the terminal.
Limitations
- Can't access server with SSH from different computer of different network. Will write an article on that later.
Conclusion
It took a considerable amount of time to comprehend and connect all the dots regarding Cloudflare, but I am pleased to say that I have successfully hosted my web application using an old laptop as a server. Since I am not hosting any heavy traffic applications but rather some hobby projects for demonstration purposes, I do not hear any fan noise. I believe that it was a worthwhile experience to have this opportunity and perform this experiment. Thank you for taking the time to read this.