Why backup in Google Drive?
Imagine you have a small Laravel application that isn’t critical enough to justify investing money in a database storage solution from AWS. Perhaps you’re not earning anything from the project. For instance, a personal blog that operates on a non-profit basis. While it’s live and contains valuable data, it doesn’t make much sense to allocate money for backups. Nevertheless, even if your project isn’t significant or high-stakes, it’s still worth considering a backup strategy.
In such cases, I recommend to utilize storage services that you already have access to, whether paid or free. Google Drive or Dropbox, for instance, offer a certain amount of free storage that can adequately accommodate your personal blog’s database. However, please note that these options may not be suitable for larger projects. Additionally, as a developer, managing backups on the server is not typically your responsibility. DevOps specialists are typically in charge of those tasks.
Remember, safeguarding your application data is essential, regardless of the project’s scale or significance. By exploring available storage services, you can find a suitable solution without breaking the bank.
If you are more of a visual learner and don’t like to read a long article, you can check out the video version of this tutorial here: Youtube Video
How to backup a Laravel application?
If you are working with Laravel long enough, you might already familier with Spatie’s laravel-backup package. This package made it really easy to take backup of any Laravel application. Here is the process:
- Make sure you have your database dumper (e.g. mysqldump) and php-zip module installed in the server.
- Install laravel-backup package. composer require spatie/laravel-backup
- Publish the backup configuration:
php artisan vendor:publish --provider="Spatie\Backup\BackupServiceProvider"
A file config/backup.php is generated. You can adjust any backup related configuration from here. The file is nicely commented for any modification you can make. Still, I highly recoment to checkout the documentation of this package to know more. We will come to this file later when you need to setup the configuration to backup our database to Google Drive.
Now, if you run php artisan backup:run , it will backup your project files and database into Storage/app/<APP_NAME> directory. You might not want to backup project code, as most likely you already have them backed up in github. So, to backup only the database, we can run
php artisan backup:run --db-only
As I already said, it will store the backup in Storage/app/<APP_NAME> . Which means, we are backing up the database in the same server where our app is running. What if something happens to our server? We want to take the backup to Google Drive Storage.
In this package it’s really easy to use any storage disk. By default backup.php config file has destination => disks array contains local only, we can add any other storage disk here. But Laravel doesn’t comes with Google storage disk out of the box. So, we need to extend our Laravel application to support Google storage disk. Actually, it’s fairly simple. Let’s do it!
How to use Google as a storage service in Laravel?
To support Google Drive storage in our Laravel application, we will use masbug/flysystem-google-drive-ext package. To install this package run the following command:
composer require masbug/flysystem-google-drive-ext
Once this package is installed, add the google storage as a disk in config/filesystems.php file. Which means we will edit the disks key of the filesystems.php file:
'disks' => [
    // ...
    'google' => [
        'driver' => 'google',
        'clientId' => env('GOOGLE_DRIVE_CLIENT_ID'),
        'clientSecret' => env('GOOGLE_DRIVE_CLIENT_SECRET'),
        'refreshToken' => env('GOOGLE_DRIVE_REFRESH_TOKEN'),
        'folder' => env('GOOGLE_DRIVE_FOLDER'), // without folder is root of drive or team drive
        //'teamDriveId' => env('GOOGLE_DRIVE_TEAM_DRIVE_ID'),
    ],
    // ...
],
As you can see, you need google’s credentials like client ID, client secret, refresh token etc. We will come to that in that later. Before that, have you noticed in our new google disk we used 'driver' => 'google' , but we don’t have any google driver. Luckly, as we already have installed this package, we can easily introduce a new storage driver called google . How?
- Open
Providers/AppServiceProviderand create a private function as below:
private function loadGoogleStorageDriver(string $driverName = 'google') {
    try {
        Storage::extend($driverName, function($app, $config) {
            $options = [];

            if (!empty($config['teamDriveId'] ?? null)) {
                $options['teamDriveId'] = $config['teamDriveId'];
            }

            $client = new Client();
            $client->setClientId($config['clientId']);
            $client->setClientSecret($config['clientSecret']);
            $client->refreshToken($config['refreshToken']);

            $service = new Drive($client);
            $adapter = new GoogleDriveAdapter($service, $config['folder'] ?? '/', $options);
            $driver = new Filesystem($adapter);

            return new FilesystemAdapter($driver, $adapter);
        });
    } catch(Exception $e) {
        // your exception handling logic
    }
}
- Now, in the
boot()method ofAppServiceProvideradd call this method as below:
use Illuminate\Support\Facades\Storage;
//...

class AppServiceProvider extends ServiceProvider
{
    //...
    public function boot(): void {
        Paginator::useTailwind();

        $this->loadGoogleStorageDriver();
    }
    //...

    private function loadGoogleStorageDriver(string $driverName = 'google') {
       // This is the method we introduce in previous step
    }
}
That’s it, we just setup our new storage driver called google! Now, we have our google storage disk that use google storage driver.
If we have the google credentials in our .env file as we used in filesystems.php config file, our new storage disk should work. So, all we need is in config/backup.php , in the destination key we, along with local we can also use google as disks or remove local and only use google as below:
// config/backup.php file

//...

'destination' => [
  //..
  'disks' => [
     'google'
   ],
],

//...
But we don’t have the Google Drive’s credentials! How to get the google drive’s credentials? Let’s see…
Get Credentials to Connect with Your Google Drive
As we are using Google drive to store the backup of our Laravel application, I assume you already have a google account.
1. Go to google Cloud Console: https://console.cloud.google.com then create new project with your application/project name.
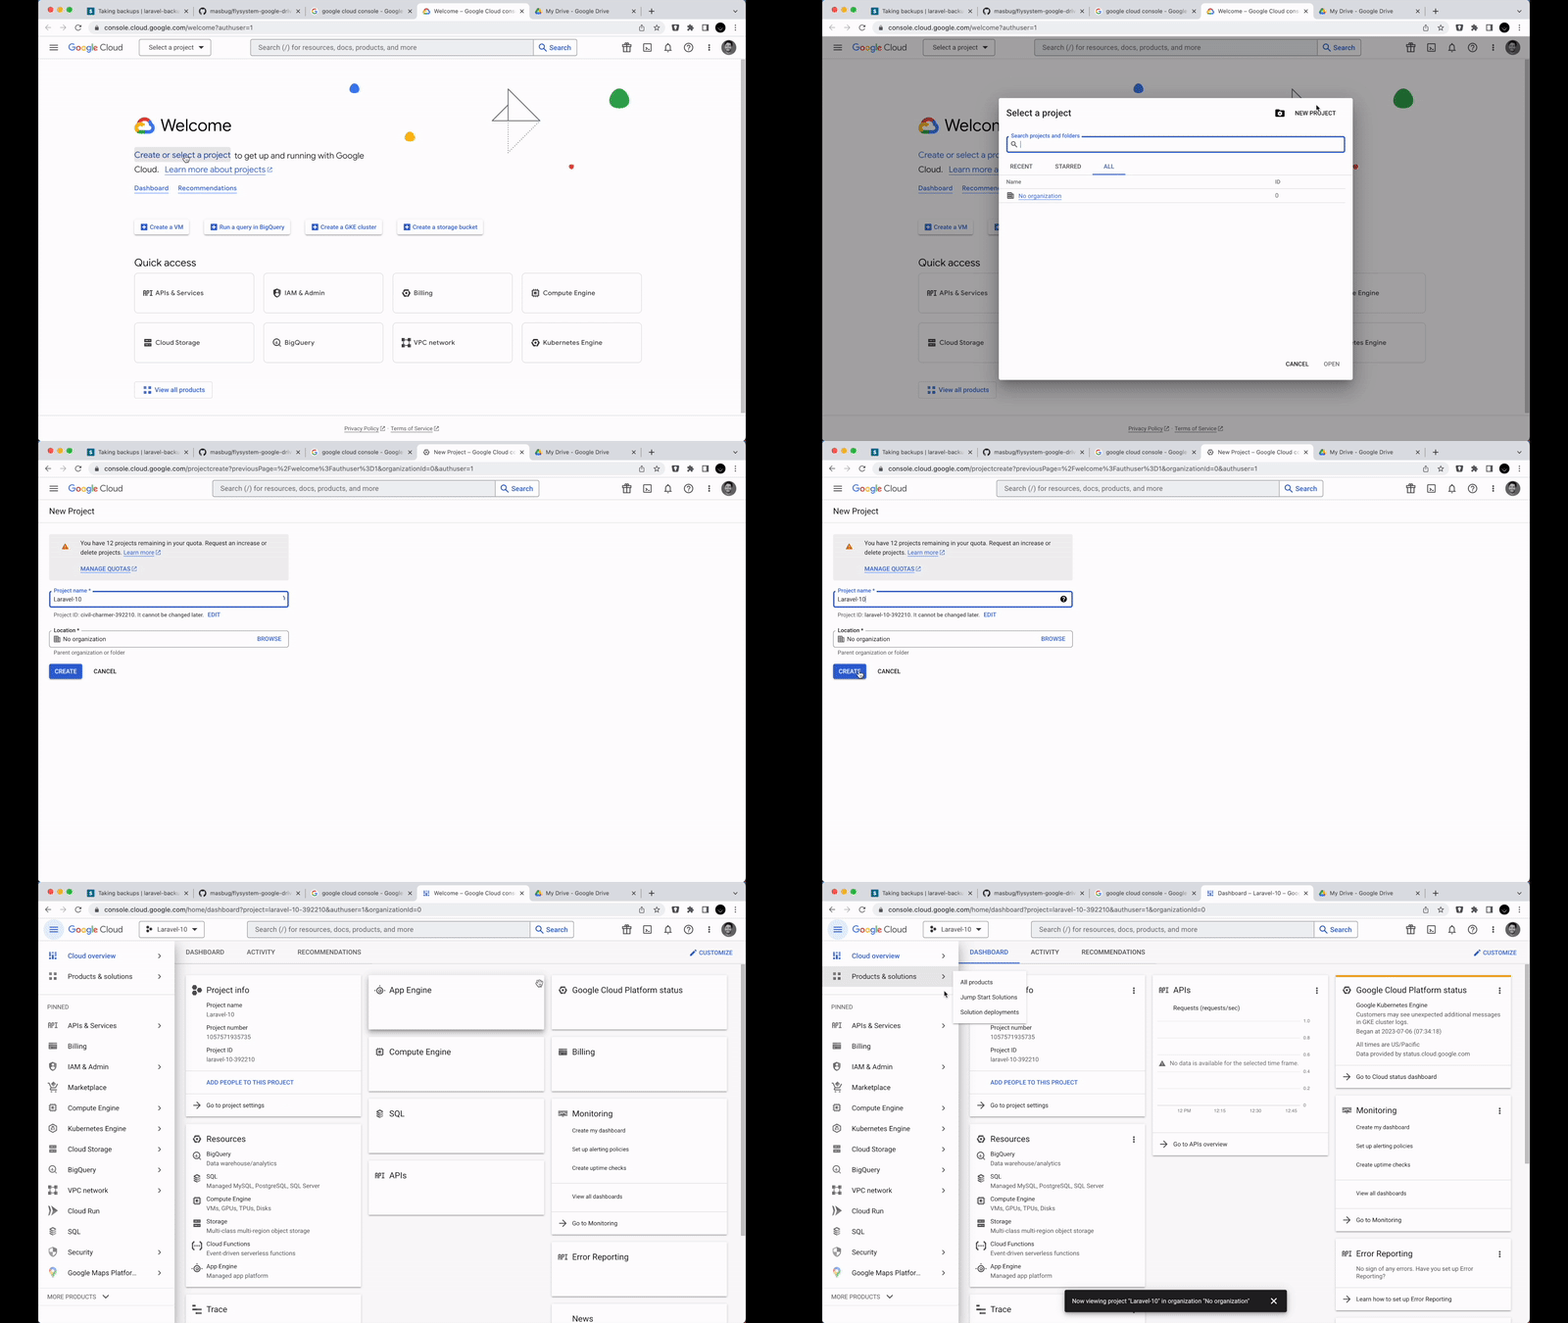
2. From application dashboard select the option called "APIs & Services". After that you will find a menu called "Library" , click on that one and then navigate to "Google Drive API" and enable that drive.
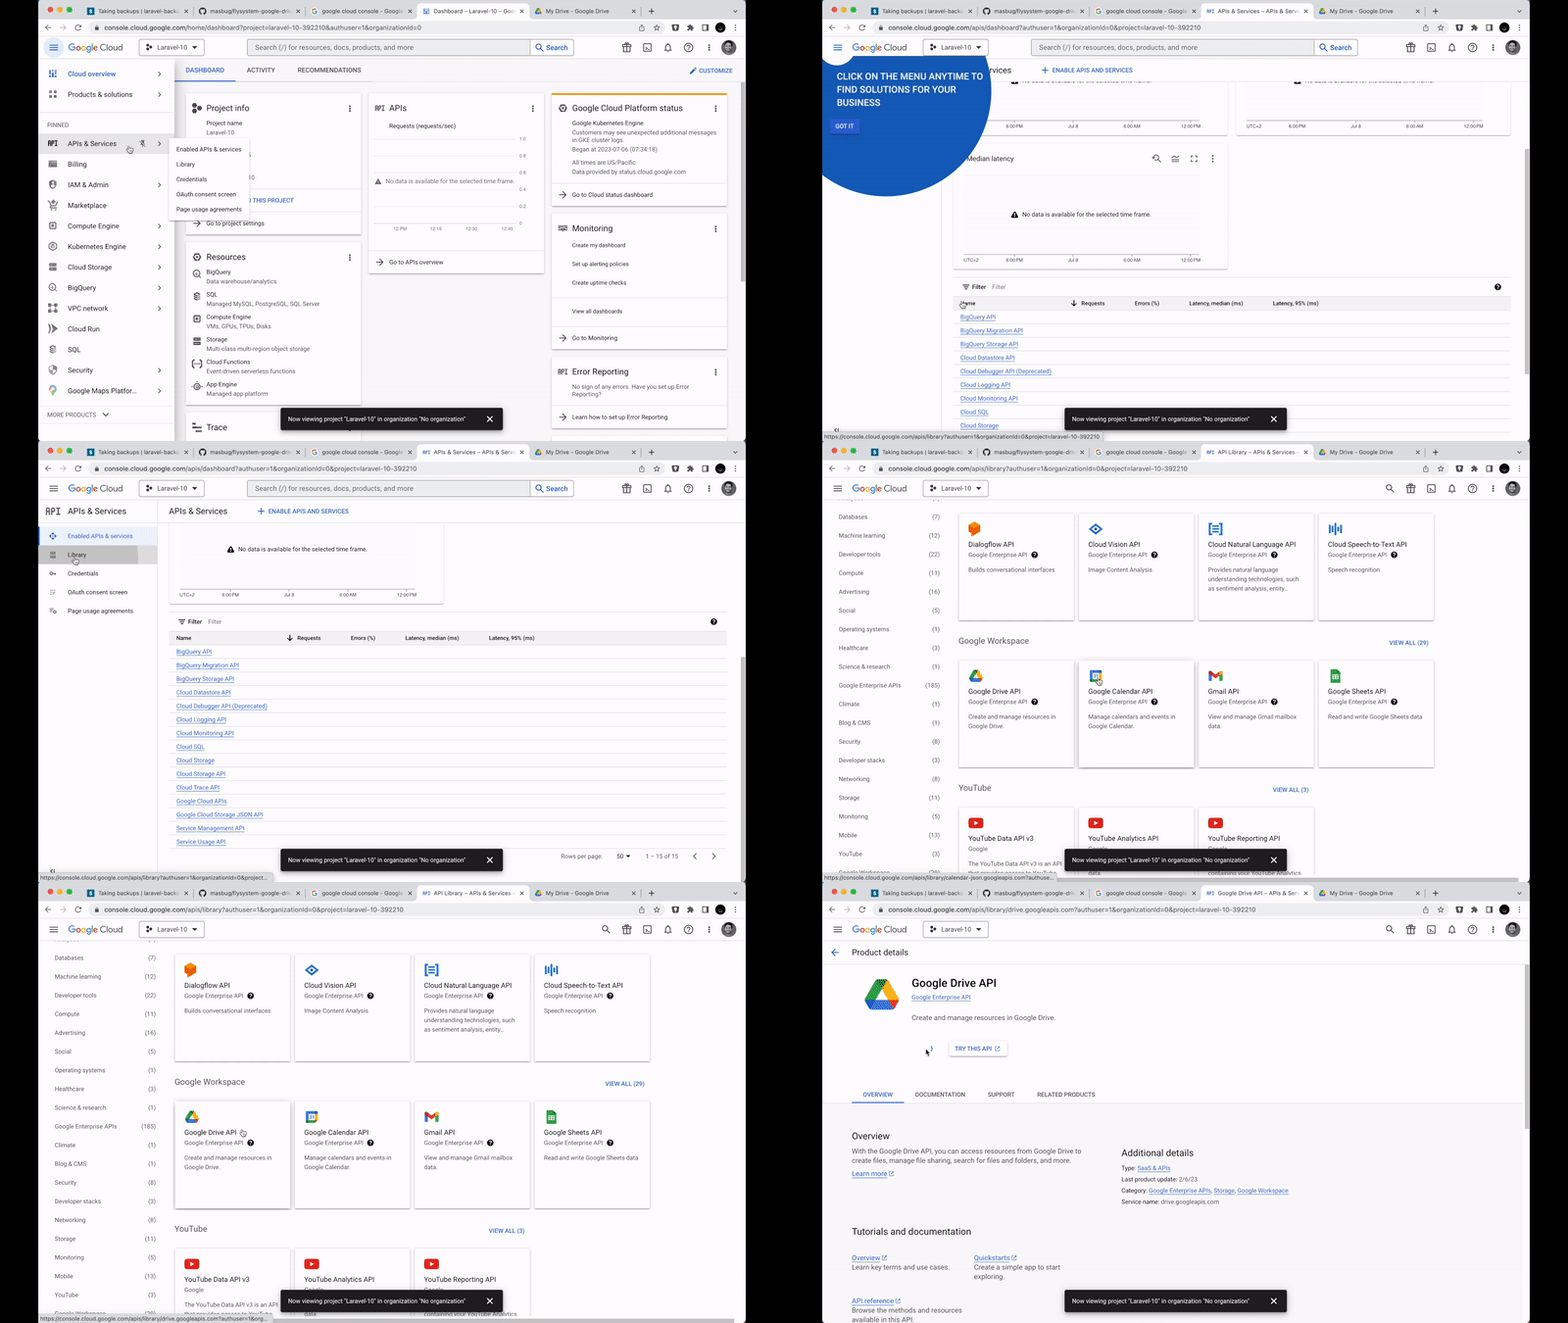
3. In the same "APIs and Services" go to "OAuth consent screen" and setup OAuth Consent and publish the app.
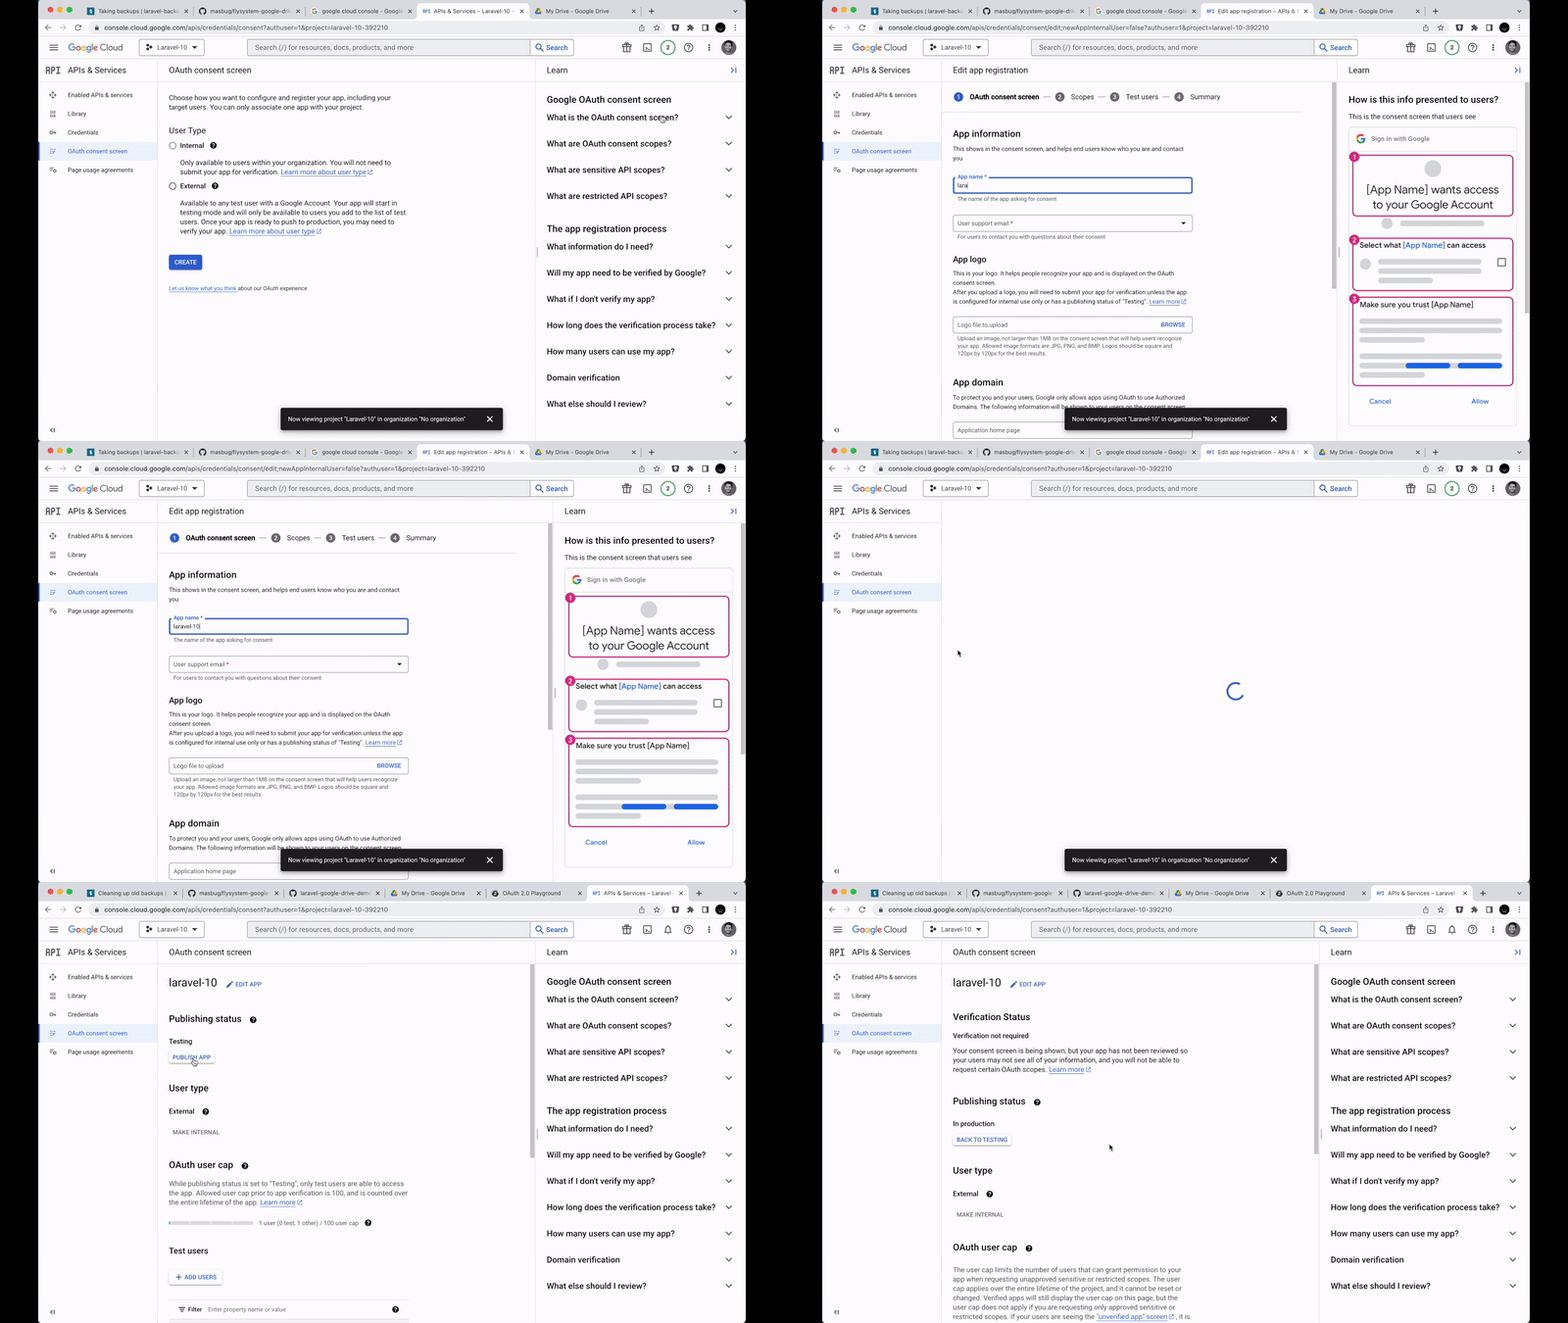
4. Now, go to Credentials, and click on "Create Credentials" then select "OAuth Client ID" Fill the client name field and add https://developers.google.com/oauthplayground as "Authorized redirect URIs" because from this URL we will authrize our credentials in the next step. Once you create the OAuth Client, you have the Client ID and Client Secret. Paste these two values in the .env file! What left? Refresh token!
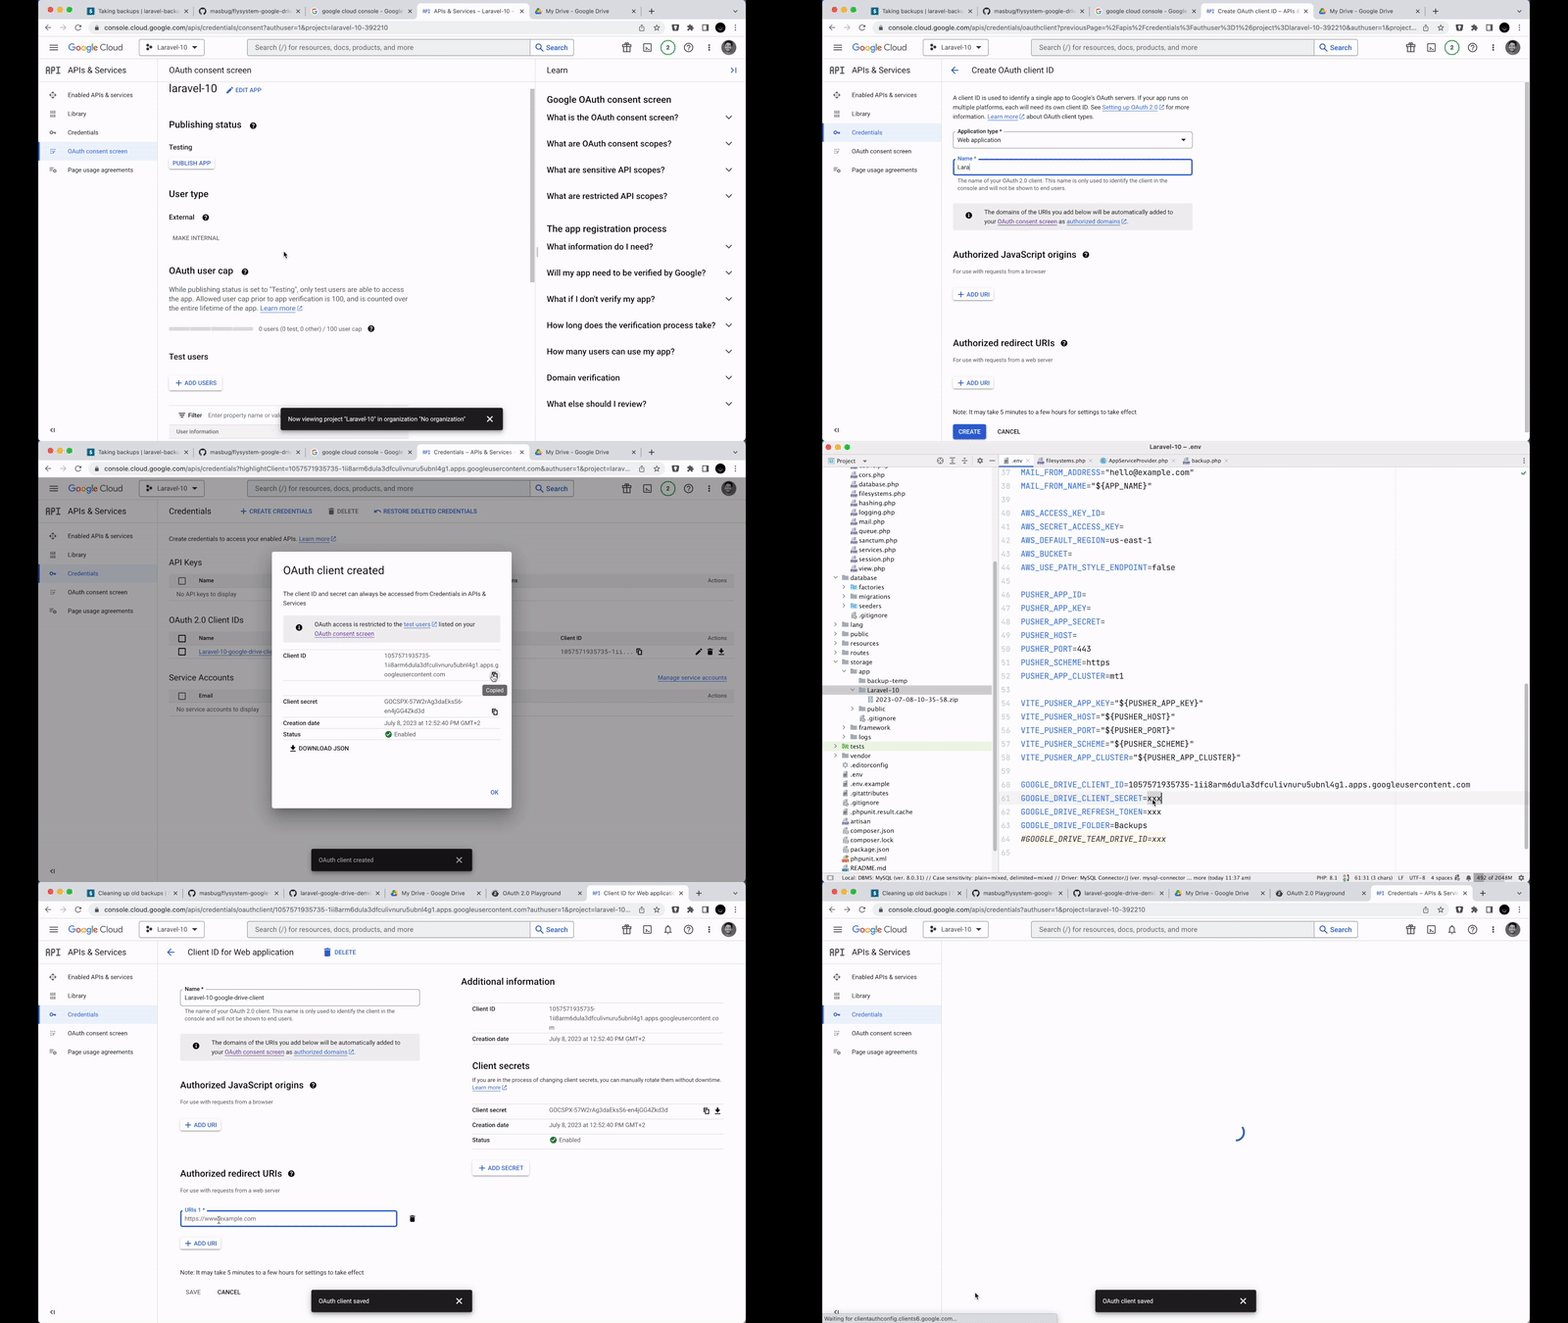
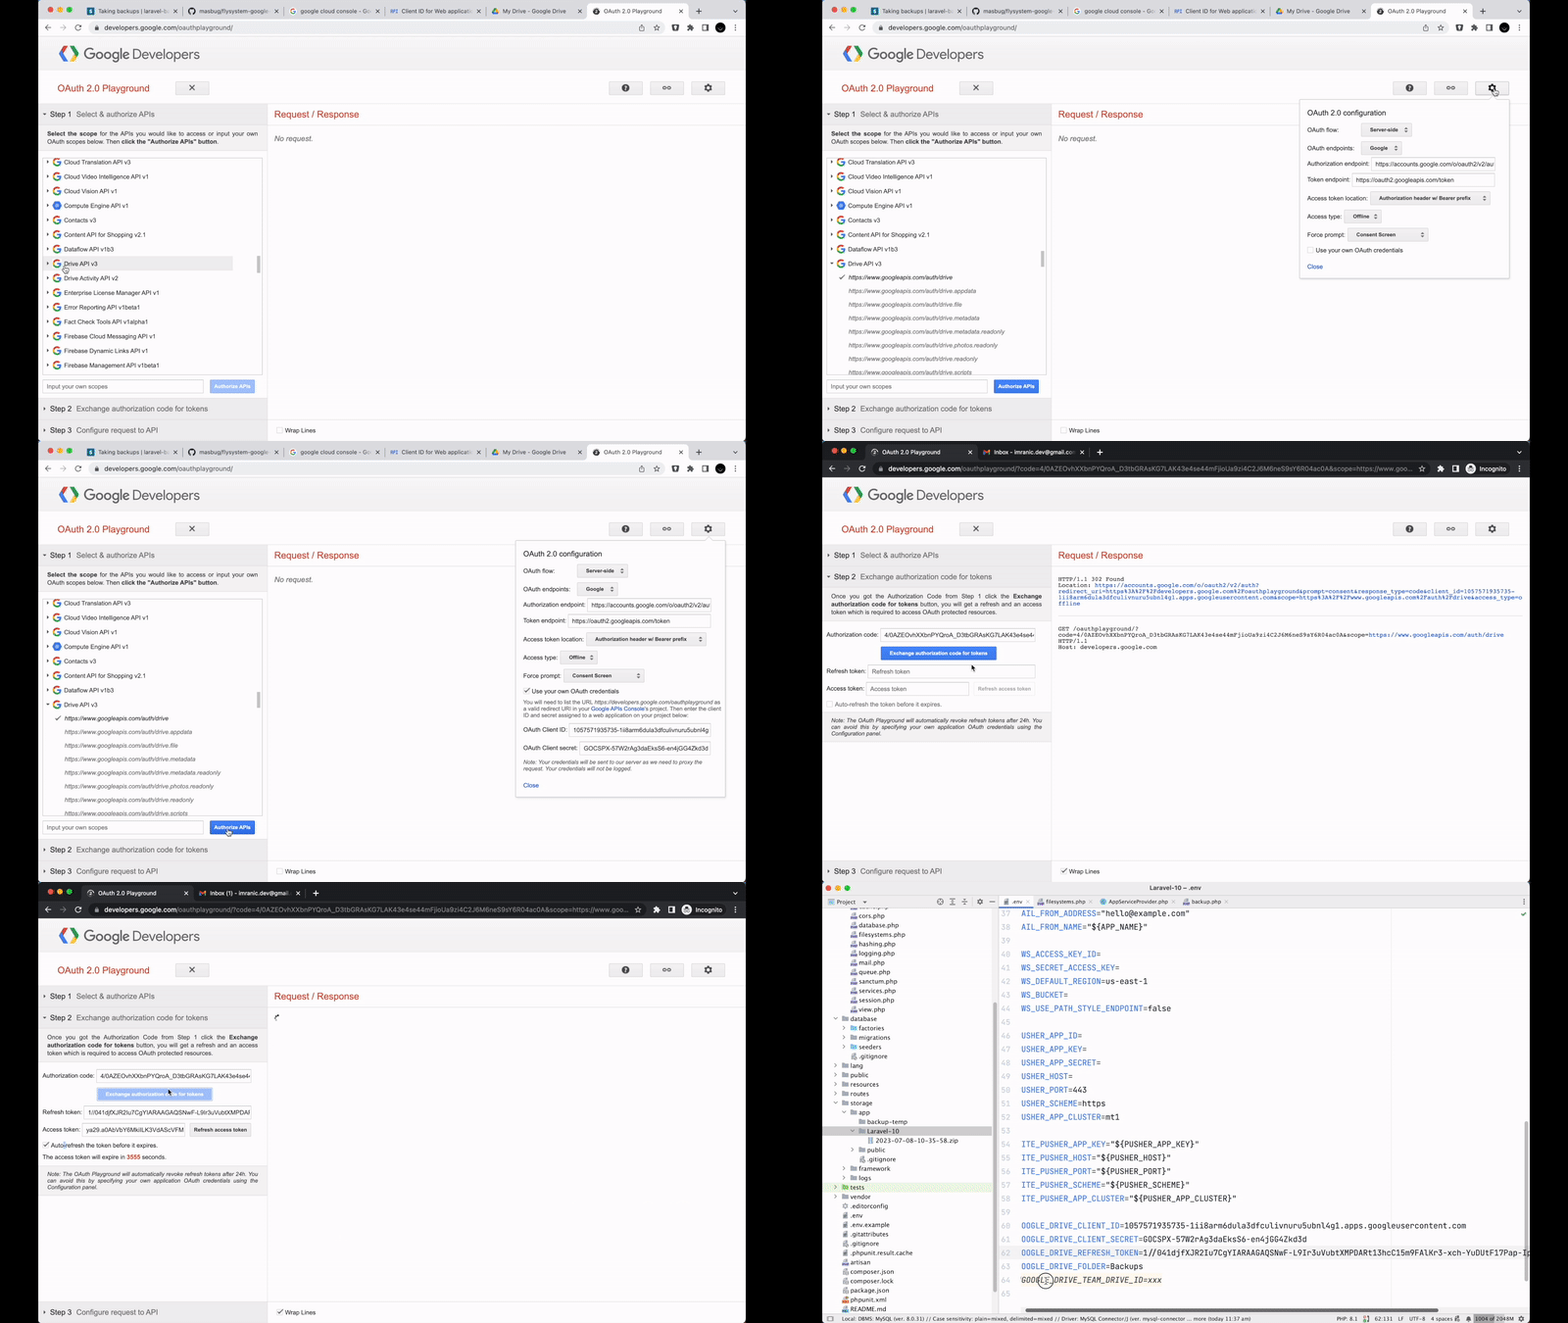
5. Now, we need to get the refresh token. Browes to https://developers.google.com/oauthplayground. Click on the top right gear icon and check "User your own OAuth Credentials" then fill the client ID and client secret with the values we got in previous step.
Then navigate to "Drive API V3" then click on the driver scope, the first scope from the list. Then click on "Authorize APIs". You might get warning saying you are granting access to sensitive data. As it’s your application, nothing to worry about. Once you procceed, you will be redirected to your gmail account authentication, authorize the app. Then you will redirect back to the OAuth Playground. There you can see the refresh token already. In the Playgournd step 2 will be collapsed. Now select step 2 again and check the chechbox "Auto-refresh the token before it expires" and click "Exchange authorization code for tokens". Now copy the refresh token from here and paste in the .env file! We have all three required credentials!
4. Now as the laravel-backup package will try to backup the database in<Root Google Drive>/<APP_NAME> folder. So, create folder’s in google drive with the exact name of your application. If you want to have it inside another folder like Backups then in .env file you can modify the variable GOOGLE_DRIVER_FOLDER to Backups . And make sure you have a folder in google drive called Backups and inside that you have another folder with the same name of your application.
Finally, we have our google driver ready to connect with our google Driver. The disks we defined in the backup.php is also pointing to google disk as destination. So, if we run the following command again:
php artisan backup:run --db-only
it will take the backup of our database and upload it to Backups/<APP_NAME> folder of google Drive!
Now, as we want this command to be executed automatically we need to add the following line in the schedule() of App\Console\Kernel class:
$schedule->command('backup:run', ['--only-db'])->weekly();
If your cron is setup correctly for this application, this command will make sure that the backup is being taken every week. You can change the backup frequencey from weekly, to daily or monthly. Whatever you prefer.
That’s it. Thanks for reading.
